


|
| ||||
|
|
Step 1. Select product type and UPC bar bar code, and fill in the product form
Select the product type first because different product types present different fields.
Select whether you wish the software to add a Kunaki UPC bar code to your product. You can read more about the Kunaki UPC bar code option here.
Fill out as many of the fields as you can. This information is used for numerous purposes. It's used to describe your product in your product's sales page if you activate the "publish at no cost to you" service, and is used to automatically design your product if you select the auto-design feature. Typical entries are shown in the table below.
| example information for audio product | |
| title: | |
| sub title: | |
| orignal release date: | |
| copyright message: | |
| label: | |
| label web site: | |
| performed by: | |
| performer web site: | |
| catalog number (ASIN): | |
| genre: | |
| description: | |
| example information for video product | |
| title: | |
| sub title: | |
| orignal release date: | |
| copyright message: | |
| studio: | |
| studio web site: | |
| director: | |
| director web site: | |
| starring: | |
| production company: | |
| catalog number (ASIN): | |
| genre: | |
| region encoding: | |
| rated: | |
| video format: | |
| audio: | |
| run time: | |
| description: | |
| example information for game product | |
| title: | |
| sub title: | |
| orignal release date: | |
| copyright message: | |
| publisher: | |
| publisher web site: | |
| developer/studio: | |
| developer/studio web site: | |
| catalog number (ASIN): | |
| genre: | |
| region encoding: | |
| rated: | |
| description: | |
| example information for other/data product | |
| title: | |
| sub title: | |
| orignal release date: | |
| copyright message: | |
| author: | |
| author web site: | |
| publisher: | |
| publisher web site: | |
| description: | |
Step 2. Select disc, case, and design
First select the disc type: cd or dvd. Then select the case. It can be a jewel case or a dvd case. To design the case and disc you can select either auto-design or custom-design.
With auto-design you select an image located on your PC or from our stock image gallery. Auto-design uses the selected image to design the disc print, case covers, and inserts for you. In most cases auto-design will render a professional looking product in just a few minutes.
Using images from our stock image gallery is royalty free.
With custom-design you control all aspects of your product's design.
If you are using this program for the first time we suggest you start with the auto-design mode and select an image that is square and has a high resolution.
Some suggestions when using custom design:
2. The images you select for the disc print and package covers and insert will be stretched (resampled) to fit the package and disc. Therefore, they need not match the dimensions listed below. To minimize resampling you should select images that are at least proportional and preferably precisely equal to the dimensions listed below.
3. Our factory prints both the disc, the case covers, and the inserts at 300 DPI.
4. Your monitor's resolution is much less than 300 DPI. Therefore, the disc and case rendered on your monitor has a significantly lower resolution than the manufactured product.
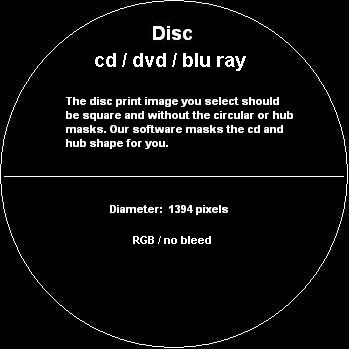
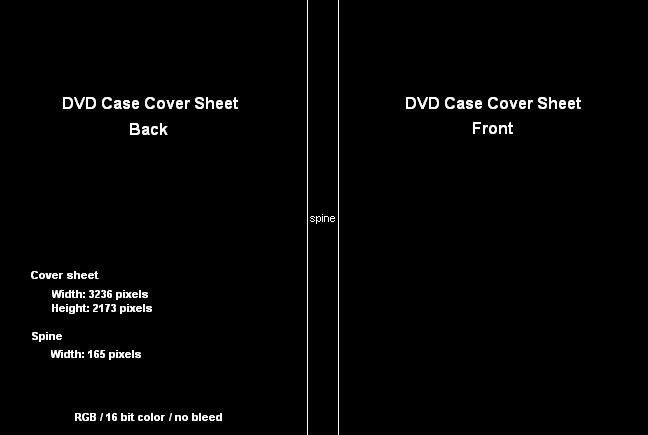
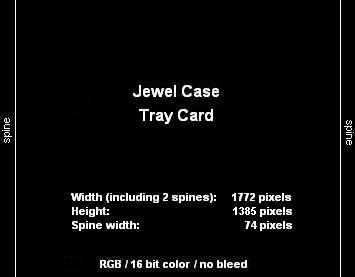
5. The table below lists the dimensions in millimeters, inches and pixels
| millimeters | inches | pixels | |
| cd and dvd disc print dimensions | |||
| width: | 118.00 | 4.65 | 1394 |
| height: | 118.00 | 4.65 | 1394 |
| note: for disc images use a square image rather than a circular, masked image. | |||
| dvd case print dimensions | |||
| cover width: | 274.00 | 10.79 | 3236 |
| cover height: | 184.00 | 7.24 | 2173 |
| spine width: | 14.00 | 0.55 | 165 |
| insert width: | 127.00 | 5.00 | 1500 |
| insert height: | 184.15 | 7.25 | 2175 |
| jewel case print dimensions | |||
| front cover width: | 120.50 | 4.74 | 1423 |
| front cover height: | 119.50 | 4.70 | 1411 |
| insert width: | 120.50 | 4.74 | 1423 |
| insert height: | 119.50 | 4.70 | 1411 |
| tray card (includes two spines) width: | 150.02 | 5.91 | 1772 |
| tray card (includes two spines) height: | 117.25 | 4.62 | 1385 |
| spine width: | 6.25 | 0.25 | 74 |
|
|
|
|
|
|
Your original contents must be located on an existing CD / DVD.
The software will copy the exact image (bit copy) without modifications.
Step 4. Select the file name for your virtual product.
The publishing software is ready to master and compile a virtual CD / DVD product into an executable program. The virtual CD /DVD product contains your selected content and your case and disc selections and design.
You can select any file name you wish. For example: C:\MyDVDProduct.exe
Step 5. Mastering and compiling your virtual product.
The publishing software will compile your selected content and case and disc design into a executable software that will present your product in software.
This process can take a few minutes.
Step 6. Review and test your product.
The publishing software will launch your virtual product for testing and review. The virtual copy is a master copy that allows you to test the contents, and your design. You can rotate the case, open and close the case, print the product elements, and test the contents.
After reviewing the master copy click the publish button.
If you are a new publisher on our system fill in your email address, desired password, name, and address.
If you are an existing publisher on our system simply fill in your email address and password.
Then click the publish button and the master copy will automatically upload itself to the Kunaki facility.
The upload process may take a very long time. The built-in uploading facility is designed to automatically recover from network outages, and reboots. It will always resume from where it left off.
A few minutes after the upload completes you will receive email informing you that the product was received.
Your product is now available for manufacturing, sale and distribution.
Step 8. Manufacture, sell and distribute your product.
You order manufactured copies of your product by accessing your publisher account at http://Kunaki.com.
From your publisher account you can also activate the "publish at no cost to you" service, check sales and customers, and delete your product.
After your product is published you can also arrange to retail your products through CD Baby (more information) and Amazon (more information).